PDXpert PLM Software
Application Notes
Designing your engineering change workflow
In Part 1 of our discussion, we defined variousengineering change forms and how they're used to create a complete engineering change process. Part 2 described how to design an individual engineering change form's workflow. In this final topic, we'll show how to configure PDXpert PLM software to reflect your new engineering change process.
Every engineering change process requires an implementing change form, which in PDXpert we call the Change Notice. We'll review the software's default CN template.
Open the Change Form template:
- In the Collection Explorer, expand the Changes group, and then expand the Change Forms collection.
- Double-click the Change Notice collection member to open the template window.
- Unlock the window for editing by pressing theF2 key on your keyboard.
- You can modify the Name and Abbreviation values to suit your company's preferences, such as Change Order/CO or perhaps Quality Change Notice/QCN. Any previously-created change forms based on the current template will be updated to use the new name.
- It's a good idea to update the Description to ensure your users understand the purpose and application of the current change form within your own change process.
In most cases, users attach files to the individual Affected items. If you allow users to attach rework instructions to the change form, mark the Show Files list option.
- In the Identifier sequence, assign the appropriate change numbering member from the Sequences: Identifier collection. You may want to define separate identifiers for each type of change form. However, assigning every new change form using a common identifier sequence (as set in the PDXpert default database) ensures that no one will ever confuse CR 1234 with CN 1234.
- If you don't manage the effectivity of each affected item separately, it's often useful to indicate a starting point for the change by marking the Show a starting boundary checkbox. This allows users to target when all of the affected items on the change will become effective. Don't enable the ending boundary, since the ECN represents a permanent update to the affected items' release/cancel status.
- If your process includes dispositioning of items, mark the Pause at Released state checkbox to allow users to update disposioning status; otherwise, clear it.
Mark the Release/Cancel iterations on Affected list checkbox. Upon approval, we want the affected items' revisions to be updated from Pending toReleased or from Released to Canceled. This is the essential difference between an implementing change and other change types.
- The Reviewing groups list defines the groups (unique responsibilities) that must approve the change form. You can add to the list by dragging a group from theGroups collection in the Collection Explorer. You can modify the review notification order so that one group (say, engineering) is notified of the routed change before another group (say, manufacturing). Setting a department's sequence to 1 ensures that department is the first to review the change. You can assign the same sequence value to any number of groups, and they will all receive notifications at the same time. (The notification order does not enforce a specific review sequence; any department can review the change earlier than specified.) The reviewer list is a starting point that can be modified when the actual change is created. You can ensure that a specific department's participation can't be changed by setting the department toLocked. The final list of reviewers should always be the fewest number that are essential to review the accuracy and completeness of the ECN.
- The Observing groups and persons list is where you put everyone who wants to see the progress and outcome of the change workflow, but aren't participating in the actual review. A user will receive an email notification during the change workflow by dragging the person's name from the Persons collection onto the list, or a group from the Groups collection. You designate when these observers are informed of a change's progress using the lifecycle phases map in the Workflow tab.
Each lifecycle state has paths that guide the change through the workflow. Each path can be enabled or disabled according to certain built-in rules, and each path can also have certain groups of users notified as the change moves along that path. Perhaps the simplest way to set the workflow is to ask these questions:
- Does your organization have a person whose role provides for checking the accuracy and completeness of the Change Notice after it's been created, and before it's routed for approval? Such a QA role may be a separate group called Document Control or Configuration Management, or an informal role handled by the originator's supervisor. If the role exists, then enable path 02; otherwise enable path03. (You can let the change decide case-by-case by enabling both paths.)
- Does your organization have a person whose role provides for checking the accuracy and completeness of the Change Notice after it's been approved by the reviewers, and before it's released? If the role exists, then enable path 13; otherwise enable path14. When the final approval is saved, the system will automatically move the ECN's lifecycle state to Accepted (for QA) orReleased (for immediate release of all affected items).
- If a reviewer disapproves the change, do you want the change to be returned for rework (08), rejected (09), stopped for further considered (10) or immediately canceled (11)? The most common action is to return it immediately for rework (08).
In the Primary discussion text template, you can specify a prompt that will be inserted for the change form's originator. If you do not want any prompt copied to a new change form, leave the box empty.
Although configuring other change forms, such as the Change Request, is substantially similar to the Change Notice, the critical difference is in two checkbox settings on the Attributes tab:
Mark the Show Files list option if you want users to attach supporting file attachments or markups.
Clear the Pause at Released state checkbox, since we're not doing any dispositioning.
Clear the Release/Cancel iterations on Affected list checkbox. Upon approval, we don't want the affected items' revisions to be released or canceled, because that's what the ECN does.
Although other change forms may use starting and ending boundaries, these values are especially relevant to temporary change forms, such as a Deviation or Stop Shipment. On the Attributes tab, note that you can enable fields for a starting date and/or serial (or lot code) number, as well as for an ending date, serial number, and/or total permitted quantity.
Deviation/Waiver and Stop Shipment forms only affect parts (never documents, never part revisions), so
- Mark the Show Files list option if you want users to attach supporting file attachments or markups.
- Clear Affected list accepts documents and mark the Affected list accepts parts checkboxes.
- Clear the Pause at Released state checkbox.
Clear the Release/Cancel iterations on Affected list checkbox because approval won't affect the release status of any items.
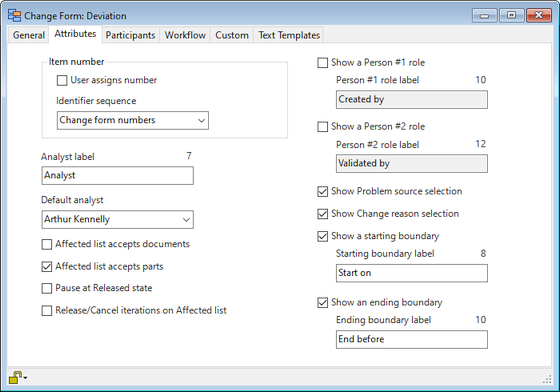
In the case of a Stop Shipment form, you may want to enable only the ending boundary. The beginning boundary can be enabled if you want it explicitly set, but the implied value is "immediately". Set the label toResume shipments on or a similar indication of when a resolution should be expected.
This application note was relevant to the PDXpert software release that was current at time of publication. Product changes since that time may affect its utility. We'd be happy to assist you in assessing the applicability of this note to your situation.