PDXpert PLM Software
Application Notes
Using Cadence OrCAD Capture CIS with the PDXpert client
Last update 2022-01-27
PDXpert provides a centralized repository of your part and document data, including management of approved supplier sources, bills of materials, revisions, and engineering changes. A "live view" of your part and supplier data is available from the SQLite database via an ODBC connection.
This note outlines the method for using PDXpert PLM software's client-side views to support OrCAD Capture CIS's component libraries.
Applies to PDXpert PLM software release 9.1 and later. For earlier PDXpert releases, see theOrCAD CIS server-side application note.
- PDXpert PLM software support for printed circuit board (PCB) design
- Creating custom attributes for OrCAD Capture CIS
- Creating the PDXpert part type
- Designing and saving the SQLite user-defined views
- Connecting OrCAD to the SQLite database
- Configuring OrCAD Capture CIS to export the BOM
- Final comments
The PDXpert database includes a set of read-only views that contain part, supplier and file records. You can use these views, via an Open Database Connectivity ("ODBC") connection, to extract part data for OrCAD or other ODBC-compliant applications.
Product data is contained in the server machine's Microsoft SQL Server database, and a subset can be enabled on the client workstation. Client-side views are designed for fast and secure CAD part lookup.
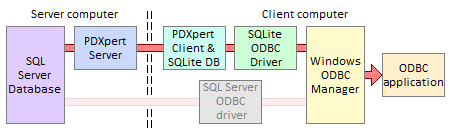
Advantages of using SQLite on the client workstation:
- Some data is materialized locally to increase query performance.
- Data obtained from local views has no network delay.
- Even when the workstation is disconnected, the local database can still accept part data queries.
- Data transfers from the server can be encrypted by the PDXpert client connection.
- ODBC connections are constrained to the local workstation, and don't require server information or credentials.
- SQL Server can be completely firewalled from the network while still providing ODBC data to remote clients.
This application note focuses on using the local views within the SQLite database. For more information about PDXpert's ODBC views, refer toContents > How to report, import & export >View & export via ODBC in the PDXpert help guide. To connect OrCAD directly to the back-end Microsoft SQL Server database, which offers different advantages, see theOrCAD CIS server-side application note.
The basic steps for linking OrCAD to PDXpert's client-side SQLite database:
- Create custom attributes (such as schematic symbol name and path) for OrCAD parts.
- Create database views for OrCAD look-ups, and save these in the PDXpert Views collection.
- Connect OrCAD as an ODBC client to the PDXpert client-side database.
PDXpert part type templates allow you to create custom attributes required by OrCAD CIS, such as component schematic symbols and layout footprints.
Before connecting OrCAD to the PDXpert database, you'll first need to define custom attributes to support its component libraries.
Parts in the PDXpert database have many standard attributes like owner, type, number, description, unit of measure, and cost; these should not be duplicated in the custom attributes.
Each PDXpert part may include an approved set of supplier parts on theSources list. Up to three sources are brought into the SourceItemMasterView. You shouldn't create custom attributes, such as supplier name, that duplicate the data on theSources list.
Read the PDXpert help topic Contents >Collections reference > Custom attributes to learn about naming and managing custom attributes. However, as you'll see shortly, we can rename any custom attribute to conform to OrCAD's requirements.
You have a lot of flexibility in how you define new part types:
If you want a simple set of attributes (e.g., Category, Value, Tolerance, Rating, Symbol, Footprint) that are shared across all items, then these can be created within a single PDXpertPart Types collection member. You could use the default system's Purchase type, or create an OrCAD-specific Component.
You can use a PDXpert custom collection that contains part categories to reflect your OrCAD CIS libraries. The collection members are assigned to the part type's Category custom attribute to identify and filter your OrCAD queries.
This is a very simple system to maintain, and a useful complement to non-significant part numbering.
You can instead create a series of part types, each of which can have both common attribute names (like Value, Symbol, Footprint) as well as unique attributes (Rating, Tolerance, Dissipation, Gate Count, Forward Drop, etc.). Each part type is the container for a unique set of standard and custom attributes, as well as a selector for your OrCAD CIS libraries.
If you're using category-based part number prefixes, then you may already have many of the part types defined.
Supplier part records can use the default system'sSource part type, and we'll include these sources' datasheet web links.
Each time the PDXpert client starts, the client-side views are updated from the server. Minimizing the number of part type views, and custom attributes within each view, reduces the time required for the client to start.
For more information about OrCAD property requirements, refer to the OrCAD CIS Users Guide, "Determining part properties" section.
We'll adopt a simple approach:
- Identify which PDXpert attributes will serve as OrCAD part properties.
- Create a custom collection of OrCAD part categories.
- Create a new CAD-related Component part type, and apply a minimal set of custom attributes (schematic symbol, PCB footprint, part category). Although this part type will usually represent purchased parts with approved sources, it may include custom in-house items (e.g., custom-wound chokes).
- Use the Source part type to identify an approved supplier part, and display its external file link as OrCAD'sComponentLink data.
We first identify how PDXpert's standard attributes will be mapped to the OrCAD part properties, and what new custom attributes will be required.
| OrCAD property1 | Required | PDXpert attribute |
|---|---|---|
| Part Number | Yes | Number |
| Part Type | Yes | custom attribute |
| Schematic Part (Symbol) | Yes | custom attribute |
| Value | Yes | custom attribute |
| Availability2 | No | Lifecycle |
| Data Sheet | No | primary source part's external link |
| Description | No | Part name |
| Distributor3 | No | second source part's Owner |
| Distributor Part Number | No | second source part's Number |
| Manufacturer | No | first source part's Owner |
| Manufacturer Part Number | No | first source part's Number |
| PCB Footprint | No | custom attribute |
| Price | No | Unit cost per default unit |
| Rating | No | custom attribute |
| Tolerance | No | custom attribute |
Notes:
- Of course, you can add more attributes to the part type.
- This value is typically maintained in the purchasing or manufacturing system, and may be too volatile for practical design decisions. In this example, we'll use PDXpert's Lifecycle value instead. If availability is consistently poor, the part should be updated with a non-production lifecycle or a better primary source.
- The PLM system manages parts with technical characteristics that are defined and documented by the original manufacturer. The distributor has no effect on these characteristics, and engineering should not care which distributor is selected to supply the part. If you ignore OrCAD's distinction between distributor and manufacturer, you'd just consider these as two sources regardless of their actual role in supplying your parts. You should always rank the manufacturer, with number and datasheet, as preferred over the distributor and its part number.
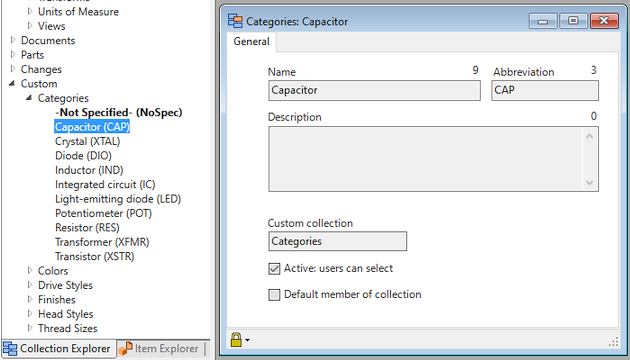
In this example, we will save the OrCAD Part Type in PDXpert as a custom attribute. Although we could choose to save the Part Type as a text string, we'll demonstrate how to use a custom collection to contain the list of all part types.
In the Collection Explorer, create the Categories custom collection to organize your part searches within OrCAD. Add new members to reflect your preferred set of OrCAD libraries.
If you have a hierarchy, create a custom collection member for each unique folder path (resistor\\fixed).
Include a Not specified member to be the default value for newly-created parts.
The collection might look something like this:
In the Collection Explorer, create a new Component member of the Part Types collection. Mark this part type's Show Sources tab checkbox and create, at a minimum, the value, category and symbol custom attributes from the previous table. Set the default Category value as Not specified.
| OrCAD attribute | Sort1 | Scheme | Name2 | Description or purpose | Value |
|---|---|---|---|---|---|
| Value | 1 | Data: String | Value | Part value used in searches | (none) |
| Part Type | 2 | Custom: Categories | Category3 | Component category | Not specified |
| Rating | 3 | Data: String | Rating | Maximum rating for the part | (none) |
| Schematic Part (Symbol) | 4 | Data: String | Symbol | Schematic part symbol | (none) |
| Tolerance | 5 | Data: String4 | Tolerance | Percent tolerance of the part | (none) |
| PCB Footprint | 6 | Data: String | Footprint | PCB footprint library name | (none) |
Notes:
- The Sort order puts longer data values in the right-side (wider) column on the Custom tab, and has no effect on how OrCAD will see the data.
- The custom attribute name should be kept simple to meet SQLite's column naming conventions and make query writing simpler. Any custom attribute name can be renamed in the SQL query to conform to OrCAD's requirements.
- To avoid confusion with PDXpert's standardPart Types collection, we'll identify this as theCategory custom attribute in PDXpert, and restore the label in our lookup query for OrCAD.
- If you prefer, Tolerance can use theUOM attribute scheme withProportion units of measure (default value %). See alternate in the example below.
You can add other custom attributes, not related to OrCAD, such as RoHS compliance checkbox or manufacturing commodity code dropdown list.
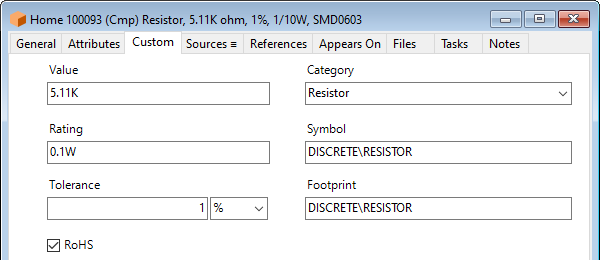
For example, a 5.11K ohm resistor based on the Component part type might have custom attributes like this:
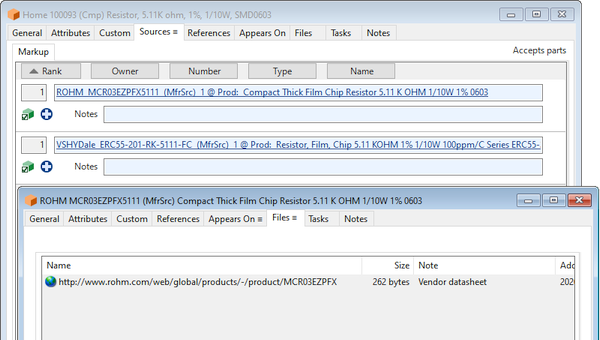
The example part may also identify approved supplier parts on the Sources list. Each of these source parts may have an external web link to their datasheets.
For information about PDXpert software's ODBC views, refer to the help guideContents > How to report, import & export >Using ODBC for export >ItemMasterView column reference and > SourceItemMasterView column reference topics.
This section assumes you've enabled the local views database, installed the SQLite ODBC driver and have a SQLite database management tool. Refer to the PDXpert help fileCreate an ODBC connection topic for details.
The PDXpert databasepublic views (with a ...View suffix) anduser-defined views (with a My... prefix) are used for ODBC queries. Custom attributes appear as columns within the views, alongside the standard columns like Owner, Number, Type and Description.
Public views in the PDXpert database provide a comprehensive set of data columns. For CAD applications, you'll only need columns that are related to part identification, CAD application support, and supplier data. We'll create some user-defined views to extract only the necessary columns.
Use your SQLite database manager to browse the public views. In particular, examine the publicSourceItemMasterView andFilePairMasterView, which are built on the more basic public ItemMasterView part & document list.
This test query selects all part records (based on theBatch Importer tutorial), but we'll soon be filtering out much of the data:
SELECT *
FROM SourceItemMasterView
WHERE Class = 1
Do not use SELECT * in your actual queries. Always specify the exact columns required.
Here's a view of external links by seeking only URIs (likehttps:// or file://):
SELECT OwnerShort, Number, Filename
FROM FilePairMasterView
WHERE [FileName] Like '%://%'
A more useful query begins to extract and format our part data and sources:
SELECT Number
,Description
,ifnull(Lifecycle, PendingLifecycle) AS [Availability]
,CostPerUnit AS Price
,OwnerShort_1 AS [Manufacturer]
,Number_1 AS [Manufacturer Part Number]
,OwnerShort_2 AS [Distributor]
,Number_2 AS [Distributor Part Number]
FROM SourceItemMasterView
WHERE Type = 'Component'
Including the custom attributes and linking the sources' external datasheet URLs:
SELECT
substr(ifnull([Number],''),1,250) AS [Part Number] -- Note 1
,ifnull([Category_Member],'') AS [Part Type]
,substr(ifnull([Symbol],''),1,250) AS [Schematic Part (Symbol)] -- Note 2
,substr(ifnull([Value],''),1,250) AS [Value]
,ifnull([Lifecycle], '*' || [PendingLifecycle]) AS [Availability] -- Note 3
,substr(ifnull(Url1.[Filename],''),1,250) AS [Data Sheet]
,substr([Description],1,250) AS [Description]
,ifnull([Owner_2],'') AS [Distributor]
,substr(ifnull([Number_2],''),1,250) AS [Distributor Part Number]
,ifnull([Owner_1],'') AS [Manufacturer]
,substr(ifnull([Number_1],''),1,250) AS [Manufacturer Part Number]
,substr(ifnull([Footprint],''),1,250) AS [PCB Footprint]
,cast([CostPerUnit] AS TEXT) AS [Price] -- Note 4
,substr(ifnull([Rating],''),1,250) AS [Rating]
,substr(ifnull([Tolerance],''),1,250) AS [Tolerance]
FROM
[SourceItemMasterView] LEFT JOIN (
SELECT [FileName],[ItemId]
FROM [FilePairMasterView]
WHERE [FileName] LIKE '%://%'
) Url1 ON [ItemId_1] = [Url1].[ItemId]
WHERE
[Type] = 'Component'
Notes:
- The standard and custom attribute names in PDXpert can be replaced to conform to OrCAD's requirements using SQL's syntax [PDXpert column] AS [OrCAD label].
- ODBC drivers may not support more than 254 characters. It's best to apply the SQLite substr() function to all text strings. substr() safely limits the length of the data, but may truncate long URLs.
- For convenience, unreleased items have an asterisk prefix.
- SQLite has limited core functions. For example, formatting a number with 3decimal places requires several operations, as well as a monospace output font: substr(" " || substr(cast(CostPerUnit AS TEXT),0,instr(cast(CostPerUnit AS TEXT),".")) || substr(substr(cast(round(CostPerUnit,1+3) AS TEXT),instr(cast(CostPerUnit AS TEXT),".")) || "000",0,3+3),-1,-10+3) AS Price
If you save a query as a member of the PDXpert Views collection (as, say, MyComponents), it's easy to group parts using the Category (Part Type) column header.
Or you can create a PDXpert Views member for each part type (e.g., a MyResistors view) just by changing the SQL WHERE clause:
...
WHERE [Type] = 'Component' AND [Category_Member] = 'Resistor'
After you've constructed the first view, the views for other part types, such asMyCapacitors for the capacitors library, are quite similar.
You've created your part types and defined their custom attributes, and designed the queries to extract your component data.
You'll now connect OrCAD CIS to the selected ODBC data source. For details, refer to theOrCAD CIS Users Guide topic "Setting up the ODBC data source".
After the connection has been established, create a configuration (.DBC) file as described in the OrCAD CIS Users Guide topic "Creating a configuration file".
Although OrCAD can export a bill of materials file, the normal output format is more suitable for printing than data importing.
But when correctly configured, the exported BOM file requires only a bit of editing.
Select the schematic, and select Part Manager from the context menu.
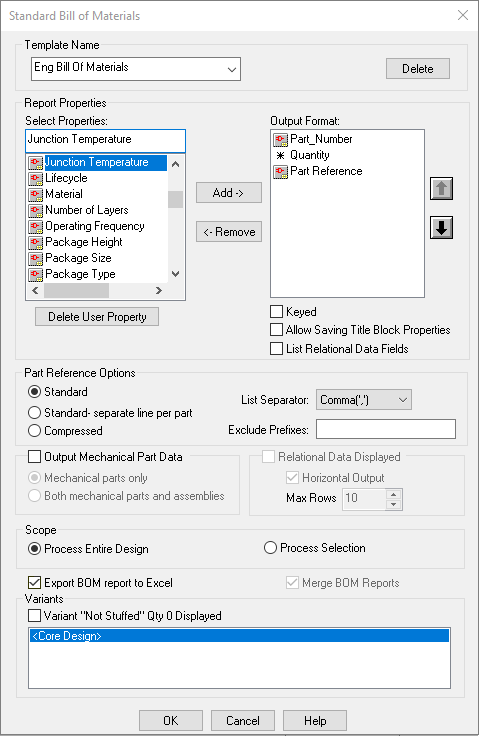
On the Part Manager tab, selectReports menu ➔ CIS Bill of Materials ➔ Standard
On the Standard Bill of Materials dialog:
Set the Template Name.
Using the Select Properties: list, set the Output Format: (column headers) as Part_Number Quantity andPart Reference
Set the Part Reference Options as Standard and List Separator: Comma(',')
Mark the Export BOM as Excel option.
Save the report file with a .csv file extension.
After the BOM file is exported to the orcad.csv file, run a simple Windows batch file to rename the header Part_Number,Quantity,Part Reference to match PDXpert's import format: ChildNumber,Quantity,RefDes You can, of course use PowerShell or other scripting tool.
@ECHO OFF
SETLOCAL ENABLEDELAYEDEXPANSION
SET "filename1=orcad.csv"
SET "outfile=pdxpert.csv"
(
FOR /f "usebackqdelims=" %%a IN ("%filename1%") DO (
SET "line=%%a"
SET "line=!line:Part_Number=ChildNumber!"
SET "line=!line:Part Reference=RefDes!"
ECHO !line!
)
)>"%outfile%"
GOTO :EOF
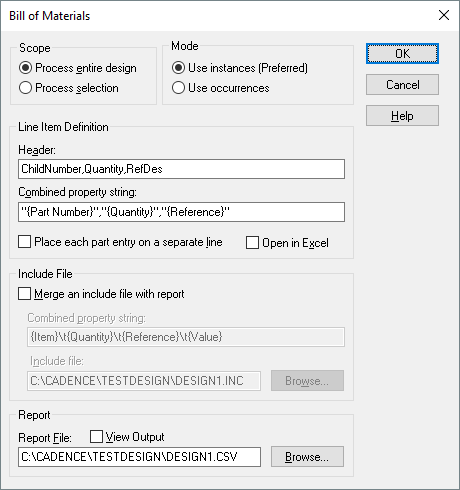
In the Design Resources, select the design (.dsn) node.
In the Tools menu, select Bill of Materials...

On the Bill of Materials window:
Set the Header as ChildNumber,Quantity,RefDes
Set the Combined property string as "{Part Number}","{Quantity}","{Reference}"
You can save the report file with a .csv file extension.
Edit the file for import into a PDXpert assembly BOM markup list.
If you do this a lot, consider a Windows batch file or PowerShell script to delete the lines.
Open the saved file in a text editor (Windows Notepad, Notepad++) or a CSV editor. (Excel may try to format your part numbers as dates or numbers.)
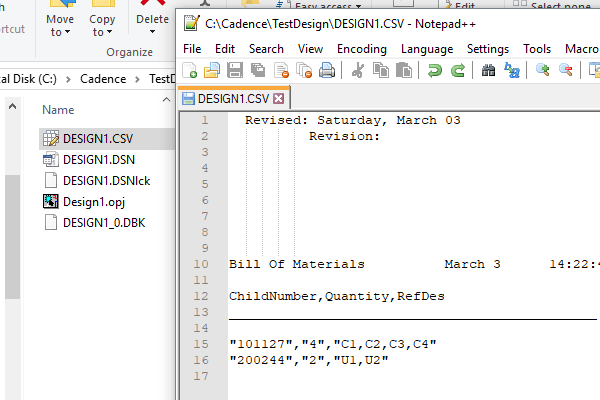
Remove the lines before the header row (ChildNumber,Quantity,RefDes).
Remove the two spacer lines immediately after the header row.
Save the edited file.
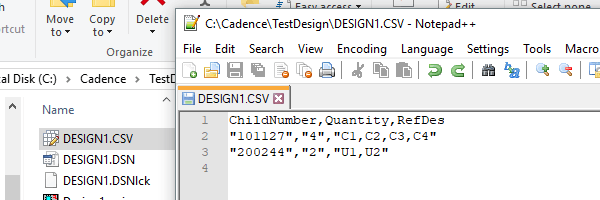
In the PDXpert client, open the assembly, select the BOM list, and select the Import Markup from File command on the Markup list's context menu.
Export only components that can be matched to a part in PDXpert. To exclude a component instance from the BOM export file, set the BOM_IGNORE property to TRUE.
Your queries will need to be reviewed, and possibly repaired, if you make changes within the PDXpert collections. For instance, the example SQL statement will fail if you remove a custom attribute or rename the Component type. Make changes to your PDXpert collections cautiously to minimize reworking your user-defined views.
Finally, it bears repeating that your SQL queries must only extract data using SELECT statements. Do not attempt to update or delete data within the PDXpert database.
Access, Excel and Microsoft are trademarks or registered trademarks of Microsoft Corp. Cadence and OrCAD are registered trademarks of Cadence Design Systems, Inc.
This application note was relevant to the PDXpert software release that was current at time of publication. Product changes since that time may affect its utility. We'd be happy to assist you in assessing the applicability of this note to your situation.