PDXpert PLM Software
On-line Help Guide
This help topic describes the current PDXpert PLM release. Earlier releases may be different. To view your release's version of this topic, open PDXpert and press the F1 key or select the Help menu.
Make an ODBC connection
An Open Database Connectivity ("ODBC") driver enables compatible third-party software – CAD, MRP, reporting tools, office applications – to read data from PDXpert's database using industry-standard database queries.
Many ODBC client applications, such as Microsoft Access, will have their own connection instructions or wizard. Look for a "connect to external data" or similar command.
The most recent Microsoft ODBC Driver for SQL Server is preferred for all new development. Microsoft is deprecating the SQL Server OLE DB provider and the SQL Server Native Client for Windows.
Advantages of using SQLite or SQL LocalDB on the client workstation:
- Some data is materialized locally to increase query performance.
- Data obtained from local views has no network delay.
- Even when the workstation is disconnected, the local database provides static snapshot of previous part data.
- The server-side SQL Server can be completely firewalled from the network.
When you enable local views, the SQLite database is automatically installed. However, SQL Server LocalDB is recommended because queries are compatible with, and can be tested on, the server instance. If you prefer to use SQL Server LocalDB, then you must install it as given in the PDXpert Installation Guide on-line: search the web forPDXpert LocalDB client
This is the recommended connection to the PDXpert database instance.

Advantages of using SQL Server on the server computer:
SQL Server can manage concurrent queries.
Data obtained from the server is immediately available, and has no refresh delay.
Any public view (not just the CAD-related basic subset) can be used in queries.
Queries can use SQL Server's full range of built-in data manipulation functions.
Table column names are somewhat more flexible for Custom Attribute names.
The local workstation doesn't require the PDXpert client to update its data.
SQL Server offers powerful development tools with better documentation, support and complementary products.
The PDXpert client starts faster because there's no client-side data to download.
If your PDXpert system uses SQL Server LocalDB, then you must upgrade to SQL Server Express (or higher) and open firewall ports to access the database from client workstations.
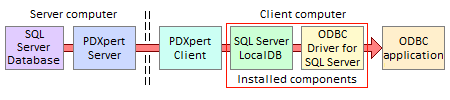
SQL Server LocalDB is a different client-side database option. It may be used where SQL Server compatibility, multi-session access and performance are important. LocalDB supports some CAD applications that don't access SQLite as a shared resource. See the PDXpert Installation Guide on-line (search the web for PDXpert LocalDB client).
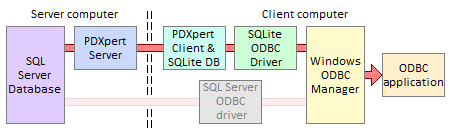
The PDXpert client can enable a subset ofpublic viewsanduser-specified viewsfor use with CAD or other local applications. These local views are contained in a SQLite database that PDXpert makes when the Enable local views: Using SQLite database user setting is marked.
The following example procedure uses a free open source SQLite3 driver. If you use a commercial SQLite ODBC driver, follow the supplier's installation and DSN configuration procedure instead.
Enable the PDXpert.db database file on the client workstation.
Open the PDXpert client application.
From the Tools menu, select theUser Settings... command.
On the User Settings tool, mark Enable local views with theUsing SQLite database option. Save the setting: Item ➔ Save, orCtrl+S.
The Enable local views option is available only when the current user has been given a Roles collection member that includes theAllow local views on user computer permission. If local views are not enabled, then the client machine's local views database is not made or, if made before, is no longer refreshed.
The SQLite3 ODBC driver is available at http://www.ch-werner.de/sqliteodbc/. When connecting 64-bit CAD tools, install the 64-bit version of the driver. When connecting 32-bit tools, install the 32-bit version.
You can ignore the installer options for SQLite 2 Drivers and SQLite+TCC components.
Click on the Windows Start menu and select the Control Panel, and then selectAdministrative Tools. Open theData Sources (ODBC) tool.
On the ODBC Data Source Administrator window, select the User DSN tab, and click theAdd... button. The Create New Data Source window opens.
From the list of drivers, select the SQLite3 ODBC Driver. Click the Finish button.
On the SQLite3 ODBC DSN Configurationwindow, do the following:
Enter a Data Source Name:PDXpertSQLite3.
Click the Browse... button, navigate to the %LocalAppData%\PDXpert folder (similar to C:\Users\user\AppData\Local\PDXpert), and select the PDXpert.db file.
Enter a Lock Timeout [ms]:10000 (10 seconds).
Select from Sync.Mode:NORMAL.
Click the OK button to close the DSN configuration window.
Click the OK button to close theODBC Data Source Administrator window.
The PDXpert.db database has data objects in three categories:
A set of public views that your ODBC client can query directly. These end with …View (for example, ItemView).
Client user-specified views that are saved as members of the PDXpert Viewscollection. These begin with My… (for example, MyReleasedParts). Although all Views collection members are shown, your ODBC client can query SQLite views only using SQLite-compatible syntax.
See view naming tips and query limitations in theViews collection help topic.
- Private viewsare prefixed as _Private. Do not query these tables, as their design can change.
Develop queries for your ODBC client application using a SQLite development tool. Search the web for SQLite manager or similar, and install your preferred tool.
Example: DB Browser for SQLite at http://sqlitebrowser.org
Using instructions from your installed development tool, select thePDXpertSQLite3 data source to access thePDXpert.db database. This is usually done using theSelect Data Source window and clicking on theMachine Data Source list. ThePDXpert.db database is located in the%LocalAppData%\PDXpert folder. It does not require user name or password.
Do not add new or delete tables or views in thePDXpert.db database. Use only SELECTstatements; do not update or delete any data contained in the database.
Using instructions from your installed ODBC client, select thePDXpertSQLite3 data source to access thePDXpert.db database. This is usually done using theSelect Data Source window and clicking on theMachine Data Source list. ThePDXpert.db database is located in the%LocalAppData%\PDXpert folder. It does not require user name or password.
After the queries are developed, add a newViews collection member with the desired SQL statement. Your ODBC client obtains the desired data from the named view.
If your PDXpert system uses the SQL Server LocalDB database, you must replace it with SQL Server Express (or higher) to allow connections from network computers. After this install, use the PDXpert Application Server's Change Database Server button to move the database from SQL Server LocalDB into the new SQL Server instance.
Microsoft often changes the ODBC driver; for current information, search the web forMicrosoft ODBC Driver for SQL Server on Windows. Some ODBC drivers will show or hide the schema (such as dbo and viewer), which may affect your client application. Your ODBC client application may have different requirements, and you should follow those instructions instead.
If SQL Server is installed on a network computer, you may also need to:
Use the SQL Server Configuration Manager application to enable the Named Pipes and TCP/IP protocols withinSQL Native Client Configuration + Client Protocols, and SQL Server Network Configuration + Protocols for PDXPERT. Microsoft SQL Server must be restarted before the changes will take effect.
Make sure that the firewalls and/or antivirus on both server and network computers allow communication to the SQL Server TCP port. Seach the web for Microsoft's help topic Configure the Windows Firewall to Allow SQL Server Access
https://docs.microsoft.com/en-us/sql/sql-server/install/configure-the-windows-firewall-to-allow-sql-server-access
This example makes a database source name (.dsn) file.
Click on the Windows Start menu and select the Control Panel, and then selectAdministrative Tools. Open theData Sources (ODBC) tool.
On the ODBC Data Source Administrator window, select the File DSN tab, and click theAdd... button. The Create New Data Source window opens.
From the list of drivers, select the most recent version of ODBC Driver for SQL Serverdriver. Click the Next button.
Provide a new file name, such as PDXpertSQLViewer, and ensure that you know where the file will be saved. Click theNext button.
After you confirm the summary, click the Finishbutton. The basic file is saved, and a new page accepts more details.
Enter a Description (such asPDXpert SQL viewer data source). In theServer location, enter the fully-qualified server machine name and SQL Server instance name, such as PLMSERVER\PDXPERT. Click the Next button.
Select theWith SQL Server authentication option to make sure that SQL Server examines the log-in ID. Apply the appropriate log-in ID andPassword values, and click theNext button.
Use the default log-in name PDXpertViewerand password By2Go4Me8 unless you've added a different account or changed the password. You can manage log-in accounts using Microsoft's SQL Server Management Studio.
Mark the checkbox to set the default database to PDXpertDB. Click theNext button.
If you want to encrypt the data, mark the Use strong encryption for data checkbox and, depending on your server configuration, the Trust server certificate checkbox. If you're on a trusted network, clear both checkboxes to avoid certificate errors. Click the Finish button.
Click the Test Data Source... button to make sure that your connectivity settings are correct. You should see the message TESTS COMPLETED SUCCESSFULLY!
If you have errors making the connection, examine your Microsoft SQL Server configuration, firewall and antivirus settings, and ODBC client application's connection procedure. (See the next section to add a port number to the DSN file.) ODBC clients must account for differences in 32b/64b applications and operating systems. Microsoft offers extensive help on the web. For example: Microsoft ODBC Driver for SQL Server https://docs.microsoft.com/en-us/sql/connect/odbc/microsoft-odbc-driver-for-sql-server. At the time of writing, Microsoft offers a wizard for Solving connectivity errors to SQL Serverhttps://support.microsoft.com/en-us/help/4009936/solving-connectivity-errors-to-sql-server
The .dsn file is a simple text file containing the connection information. It can be viewed and edited by Windows Notepad or similar text editor. This example includes the PWD= argument to simplify log-in.
[ODBC]
DRIVER=ODBC Driver XX for SQL Server
UID=PDXpertViewer
PWD=By2Go4Me8
SERVER=PLMSERVER\PDXPERT
DATABASE=PDXpertDB
WSID=PLMCLIENT
APP=Microsoft® Windows® Operating System
DESCRIPTION=PDXpert SQL viewer data source
If your SQL Server is listening on a port other than the default port, then the SQL Server log file will show the port number:
07/18/2019 12:34:56,Server,Unknown,Server is listening on [ 'any' <ipv4>16361].
Add the address parameters to the DSN file using the server's IP address or machine name (ADDRESS=server,port):
ADDRESS=10.1.1.1,16361
ADDRESS=PLMSERVER,16361
SQL Server Management Studio can be used to develop views which, after testing, can be saved as members of the Views collection.
SQL Server Management Studio is both powerful and potentially dangerous to your PDXpert database. The complete set of undocumented PDXpert database tables and private views may be visible. These private objects, which use the default Database Owner (dbo) database schema, are compiler-generated and may change from one release to the next.
Use only SELECT commands, and only objects within the viewer and released database schemas. Only very experienced SQL developers should consider updating or deleting data in the PDXpert PLM database.
Do not add your own table, view, stored procedure, or other resource directly into the PDXpertDB database. A PDXpert system upgrade deletes unknown objects before rebuilding public views and members of the Viewscollection. Make a separate database to hold your own objects.
When writing SQL code, query views, not tables.
PDXpert PLM database objects may change after an upgrade. Where possible, base your queries on public views and user-specified views.
PDXpert's documented public views, as well as members of theViews collection, are within the safeviewer database schema, such as PDXpertDB.viewer.ItemViewor PDXpertDB.viewer.MyReleasedParts.
The default public views log-in name is PDXpertViewerand password is By2Go4Me8, unless you add a different account or change the password. You can manage log-in accounts using Microsoft's SQL Server Management Studio.
1172