PDXpert PLM Software
On-line Help Guide
This help topic describes the current PDXpert PLM release. Earlier releases may be different. To view your release's version of this topic, open PDXpert and press the F1 key or select the Help menu.
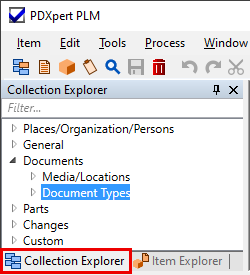
Arrange the Explorer windows
You use the Item Explorer and Collection Explorer (the "Explorers") to search for, select and drag collection members (like units of measure) and items (documents, parts and changes). You can drag objects from the Explorers onto lists in the item workspace.
The Explorers can be arranged to best suit the tasks you're performing.
Auto Hide allows you to minimize Explorers along the edges of the PDXpert application window so that the windows do not occupy valuable space. By minimizing Explorers, you can increase the viewable area of the workspace.
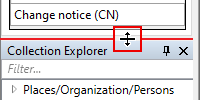
You pin or unpin an Explorer by clicking on the thumbtack icon, which toggles between the two modes.
 When an Explorer is "pinned" to the workspace, the window will remain open while you perform other tasks.
 You can unpin your Explorers, which lets them slide back to a tab on the edge of your workspace where the Explorer is docked. If you position the mouse over the tab, the Explorer will "slide out" from the tab area.
The Explorers may be "floated" anywhere on the screen, fully independent of the PDXpert application window.
To create a floating Explorer, the window must first be pinned. Then, select the Explorer's title bar and drag it until the preview outline does not snap to any dockable areas. When you release the mouse, the Explorer will float in its own window.
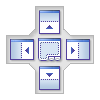
You can dock the Explorer along any edge of the PDXpert application workspace. Select the Explorer's title bar and drag it to one of the four docking images near each window edge.
You can re-dock a floating Explorer window by selecting theWindow | Reset Explorer Docking command.
When the windows are stacked, adjust how much workspace is dedicated to each one by dragging the splitter bar.
A splitter bar sets the Explorers within their minimum and maximum sizes. When an Explorer is minimized, only its title bar is displayed.
You can increase the size of an Explorer by dragging the edge furthest from its docked edge. The dragged edge position can be different for pinned and unpinned modes.
This feature automatically groups the Explorers together with tabs representing each Explorer. Only the contents of one tab may be displayed at a time. Only the active tab is closed when the Close button is clicked and only the active Explorer is unpinned when the thumbtack icon is clicked.
You can arrange the Explorers to be side-by-side, top-and-bottom or overlapping. Drag one Explorer on top of the other, and a positioning aid will appear. Drop the Explorer on one of the four outside images to arrange the Explorers next to each other, or drop the Explorer onto the middle image to overlay the two Explorers.
Click on the row to select it. Once the row is selected, you can drag the contents onto another grid, or double-click to open the item.
You can adjust a column width by dragging the grid line that separates the rows.
Drag a column header to move the related column to a new position.
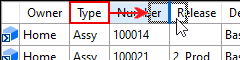
Click on the column header to sort the rows by that header. One click will sort the rows in ascending order, a second click will sort the rows in descending order.
Guest users who are primarily interested in looking for items can unpin or close the Collection Explorer. You may prefer to dock the Item Explorer along the bottom edge of the workspace if many items have long document titles and part descriptions.
During periods where you're creating many parts or documents, it may be easiest to keep the Collection Explorer pinned on the left window edge, and the Item Explorer pinned along the bottom edge. After you've created the items, you can search for items to drag onto your new items' BOM andSource markups, and when dragging items onto the releasing change form's Affectedtab. (The Explorers overlay also works well for these tasks.)
For most administrative tasks, the Collection Explorer can be pinned to the left or right edge of the workspace. Auto-hide (unpin) the Item Explorer.
1153